Tuesday 25 May 2010

Bookjacket Brief Part Two – Final Blog

Finally, I have completed an entire brief from start to finish. As I said in Part One, this has probably been my most successful brief, I hope. It was relatively straightforward and full of experimenting and workshops, which I found enjoyable.

After the 3D workshop I was in the hub with Dave Kelly, getting ready to do the digital workshop, only to find out I already knew everything I needed to do to get on with it.

Using the very basics of Photoshop we were to create a 2-colour and black-line overlay print of the book cover.

I can’t stress how easy this part of the project was, I literally finished it in a matter of hours. Whether that’s a good thing or not, I don’t know.

I’d learned a lot about drawing in Photoshop from my Mabinogi project, and so I drew up a very bold black-line image of the front cover of my Bookjacket, using the pen tool. Then it was simply a matter of filling it in with different colours to see what worked.

The great thing about Photoshop is the hue/saturation option, which allows me to change any colour at will, allowing me to see what colours look nice where. This is the tool that made my job so easy, as I was able to mock up some designs in about an hour. Here are some, but not all, of the designs and colour combinations I came up with.


I was very partial to the neon pink/orange/yellow/black combination I came up with, and decided that those were the final colours I would use in the finished piece.

The fortnight afterwards I was doing on the Traditional Media workshop with Sue Thornton. After looking through some of the watercolour and acrylics work I’d brought in she gave me some tips and advised me that working in acrylics would be rewarding, but challenging. I heeded this advice, but decided I wanted to try and work with that medium nevertheless (see Tie Die post).

Finally, the Printmaking workshop with John Archer. I have been doing printmaking for over a year now, and although I enjoy doing it, I’m nowhere near perfect. After a disastrous start and a few mishaps I was sorry to only come out with three prints of any real tidiness. However, I managed to stick to my colour combination as you can see. It appears to work in most mediums!


And a few experiments and painful hours later, here is the finished piece in acrylics (and a watercolour pink).

Bookjacket Brief Part One – 3D Model

Beware if you don’t like spiders – this blog is completely centered around them.

Well, I have to say, this has possibly been the most enjoyable brief I've attempted this year, and (hopefully) the one that will save my hide during the assessments, as I feel I've produced my best work here.

As mentioned in previous posts, the Bookjacket brief required us to create a book cover for a nature-themed book. From all the subjects I decided to go for The World of Spiders, because Spiders are brilliant, intricate and so beautiful (a million women are screaming right now).

I started with the basic research, drawing diagrams such as the spider anatomy, facial close-ups, different species and the various types of spider’s webs, but when it came to the thumbnail designs it only took me about three or four drafts until I was happy with one design. See my Tie Dye post to spot the design.

I set my heart of the close-up of the spider face with their big pearly black eyes, making a few changes here and there throughout each draft. It was then that we were given our workshops.

For the first fortnight I had a blast working in the 3D buildings, which, annoyingly, I was not aware that I have been allowed access to for the last year and a half. At first I was clueless about what I wanted to do with the project, but after some inspiring demonstrations from Dave Jones, which included showing us how to carve into polystyrene and vacuum-form objects, I asked to have my arm cast in mod-rok; my idea was to adapt my ambition as a tattooist and “perform” the tattooing onto the cast arm, using only spider-themed images.

Here's me looking ecstatic:


Dave handed me a book to flick through called 500 Figures in Clay, an absolutely gorgeous collection of inspiring 3D art. I picked out a few of my favourites and photographed them to give myself an idea of what I wanted.


Once the arm cast had dried out I painted it a pale skin colour similar to my own, then set about designing some “tattoos” for it.


I’ll be the first to admit they are not precisely what I had in mind. This 3D work was to be my piece de resistance, but I rushed the tattoos and did not put much thought into them, and so I ended up with these.


When it came to transferring the designs to the arm-cast, I had visions of doing it the way tattooists do, using carbon paper. Alas, I could not get hold of any, so I transferred them by hand. It was probably the easiest part of the project, as painting them turned out extremely difficult. As the cast had been made quite rough and thick I had a hard time sanding it down and there were a lot of cracks and grooves that would disturb the paint. Watered-down acrylics would not take to it very well, and so I had to take my time, painting it with undiluted acrylics very slowly. Suffice to say my neck is still aching from the concentration.


And yet I am not particularly happy with the final outcome. I know this is because I rushed it near the end. In an attempt to polish up the rest of my projects I left this one until last minute and jeopardized it’s success. However, as my boyfriend stated, I sure did learn to plan ahead and take care next time around.

My plan was to do a series of arm casts painted to look interesting, for example: a tattooed arm, a zombie arm, a bionic arm, etc. It’s something I would perhaps like to look into doing next year.

As well as the arm cast I had a go at vacuum-forming a rubber spider, making a cast of it and creating my own little red latex spider. It was for no particular reason other than experimentation. However, in the end I decided to use it in the final 3D model as an arm adornment. Since glue didn’t hold it on, I actually had to sit there and stitch it to the cast!


I guess what they say must be true: “Prior planning and preparation prevents piss-poor performance”. And don’t I know it!

Finally, in a very sad and ironic twist of fate, my tarantula Mandy died during the project. I brought her in after being told I could preserve her in resin to use as an ornament, paperweight, fancy decoration, whatever.

Here she is, lovely as ever!


Bookjacket Brief Part Two – Final Blog

Wednesday 19 May 2010

The Pearl of Lulworth Cove

I feel compelled to share this with you all.

When I was in Dorset during Easter, I made it a mission of mine to seek out The Shell Painter, an artist I remember from my youth.

He would sit on the steps near Lulworth Cove beach and dazzle me with his beautiful paintings on shells, stones and bits of glass, some of them very tiny.

I was happy to find him still sitting there, painting his lovely little souvenirs, so I had to buy one.

I even spoke to him, told him I remembered him from my childhood. He told me he’s been doing it for twenty-odd years now, and that occasionally people would come up with their children, and insult him with comments like “you could do better than that.”

What they don’t see is the love and care that goes into his tiny works of art, and his steady hand. I purchased a small stone off him with a painting of a mermaid on it along with a poem:

"How often and often I wish
I lived in green depths like a fish!
No noise, not a thing,
But the mermaids who sing
Whilst their tales give a silvery swish.

Frances Cornford"


Take a look for yourself, it’s beautiful.


So I must insist that if you’re ever down in Dorset, head to Lulworth Cove beach and you’ll spot him a mile off. I took a photo of him myself, but you can find a much clearer one here.


Purchase one of his little treasures and encourage more artists to live the dream!

Monday 17 May 2010

Blog 3: In which I am at peace with my ambitions

It’s been a while since my last post, but my exploration of the tattoo world is increasing each day!

I’m so excited. Soon I will be free for the summer to pursue an ambition that is fast becoming real to me. Of course, I’ve read enough to know that getting into the tattoo world takes time, patience, dedication and unbelievable talent (for those who actually appreciate fantastic art) but for the first time in my life I feel positive that I have found a place that I may belong in the art world.

However, everywhere I look I end up selling myself short; because I feel I am nowhere near up to scratch. I haven’t had the benefit of tattooing since I was 14 like some artists, but I have had the benefit of learning to draw throughout my entire life. I feel that the precious stone of my artwork is there, but that it really needs polishing and refining, which could take a while.

I have been reading up non-stop on tattooing, watching documentaries, investigating for over a year now, but I am still missing hands-on experience. In the tattooing world, it seems, there are literally millions of people gunning to be tattooists nowadays, and apprenticeships are harder to come by, because artists are reluctant to hire just anybody.

Which is why I need to create art that is worth its weight in gold.

I get that people don’t want shoddy artwork besmirching their skin, and many’s the time I have drawn something, only to hate it minutes later. I would feel awful if I were not a really good artist by the time I approached a tattoo studio, if not a great one.

And so, to prove to myself and to prove to others that I am not just in this for the so-called fame and glory of tattooing, that shows like LA and Miami Ink glamorise (although I love those shows, they are unrealistic), I asked myself why I want to become a tattoo artist:

1. To create artwork that fascinates people.

2. To gain further insight into a historic practice that intrigues me.

3. To become a better artist and a role model for my brothers.

4. To see the World.

5. To help people, most notably a close friend who suffers from Vitiligo (a skin condition that causes the pigments in the skin to fade).

6. It will allow me to learn a vast array of art styles: no limits.

7. It embodies a lot of styles that I am already familiar with.

8. It requires no phony degree, only raw talent.

9. I want to be an approachable woman in a predominantly male profession, and one other women and girls can look up to.

10. I wish to find my own “Mr Miyagi”: my sensei who will guide me on my path to artistic enlightenment!

11. I want my dad to want me to tattoo him.

12. At the end of the day, it feels right.

So I hope you can see that any passion I have for art is exclusively injected into this ultimate form right now!

On a final note, I can now be found on the forums of Big Tattoo Planet, under the name JemimaLee. This promises to be a very insightful website and a great way to communicate with fellow artists and skin-art fans, so if you happen to be on there don’t be afraid to add me as a friend!

Thursday 6 May 2010

Dying to Tie it

I’ve been taking care of my younger brothers this week whilst my parents were away for their wedding anniversary. And so I have taken the perfect opportunity to mess up the kitchen and turn it into my mini-studio to work at home from whilst I’m in dire need of a decent desk.
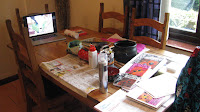

It may look cluttered, but this is tidy to me and I’ve never felt so humbled. I’m sad to have to tidy it all away tonight now that the parents are home.

However, it has allowed me to do a lot of work, particularly on my Bookjacket project. This week I missed the traditional media workshop, in which my tutor promised to take a look at my use of watercolours and acrylics. So I had to take it upon myself to practice and experiment. Which I did. And I loved it!

Acrylics are so pliable! Once they’ve dried you can layer them on top of one another without losing or changing the colour. I find my favourite effects come with using a dry brush, which gives me a real grungy, rough stroke.


As well as acrylics I have also tried many other media to try and evoke the right feeling for my World of Spiders Bookjacket. Try and guess which media I used where…


My personal favourite though has to be this one.


I love the bold neon colours, they’re eccentric and really punk rock! And much more colourful and imaginative than anything else I’ve come up with.

Just one more week of printmaking and I should have at least one final Bookjacket design if not three different ones (digital, traditional, screen/lino printed). As for the 3D model that refers to the Bookjacket brief, I am doing something a little different, stay tuned for a blog on that later.

As well as working on my uni work I also took some time out for three cans of Monster Energy and some good old-fashioned hippie tie-dying.

I haven’t tie-dyed since my girlhood days of Brownies and Guides, where I made a blue hankie. It was awesome.

But my latest project is much cooler.

I started by buying myself some Dylon hand-dying powder from an art shop. It was less that £6 for two packets, so I grabbed yellow and violet, the colour my hair used to be, and one of my favourite colour combinations. Then I bought a cotton vest from Tesco for £3. Sweet!


I washed my vest to get rid of any impurities, then I followed the pack instructions… almost. I decided I wouldn’t need two full packs of dye for one tiny vest, so I halved everything. Where the pack told me to dissolve the powder in 500ml of water, I dissolved only half the pack in 250ml of water, and so on. So when I tell you how I did it, keep in mind the measurements have all been reduced by 50%.
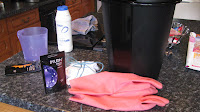

After dissolving my dye in warm water I got a fresh bucket and filled it with three litres of warm water. Warm meaning it was hot but I could easily put my hand in it. Then I added 2 ½ - 3 tablespoons of regular table salt. The salt helps to open up the pores in the clothes, enabling it to take on the dye more easily.


Once the salt had dissolved I pored my ready made dye into the bucket of warm water and mixed it well.


Now for the creative part. I decided to go for a swirl pattern on my vest. There are many patterns and you can find them online, or on youtube videos, particularly this one. Basically I just pinched the (damp) fabric and twisted it. Then I used some string to tie it up really tight into a little bundle.


When I was happy with the bundle I dropped it into the diluted-dye mixture. The pack asked me to stir continuously for 15 minutes, then occasionally for a further 45 minutes, so that the fabric is steeped for a full hour. But obviously you don’t have to be so anal, they’re just guidelines.


After about an hour I poured the water away and rinsed the bundle under cold water until it ran clear. Then I rinsed it further in warm water. When I was happy that the dye was fixed I squeezed out any excess water and left it damp, ready to go again.


I repeated the entire process, this time with the yellow dye. All the advice reads that you dye using your darkest colour first, finishing with the lightest.


The only thing I changed this time besides the colour was the pattern. I twisted and contorted the fabric a different way, aiming the get any white fabric dyed yellow for a nice mix. Then I dropped the bundle into the dye again and gave it an hour.


After cleaning and rinsing the fabric, and feeling chuffed with my work, I left the vest to dry. I’d been advised not to use direct heat or sunlight for this.

Finally, I ironed my vest to fix the dye and… well you can see the results for yourself!


It was an easy, hassle-free process, cheap and the results are fantastic! I’ll be doing a towel for my holidays, a shirt for my sister and some bed sheets to brighten up my bedroom. For these I would like to further my understanding of the process in order to create other patterns, effects and even images with the dye.

In the words of Neil Buchanan, “Try it yerself!”